Rigid Foam Insulation for 2×4 Walls: Benefits, Applications, and Tips
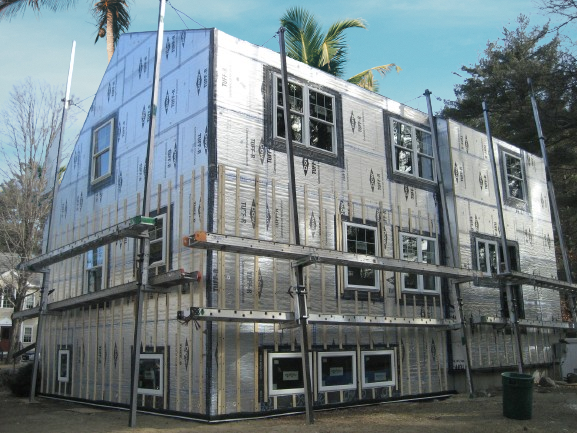
All of us can agree that one of the best materials for insulation is rigid foam. Rigid foam, in contrast to other forms of insulation, is resistant to moisture damage, doesn’t move around easily, and can also serve as an air barrier.
Additionally, rigid foam insulation is very adaptable. In other words, it has a broad range of applications. However, is rigid foam insulation suitable for 2×4 walls? That’s what this article will be covering, so stay tuned.
Is Rigid Foam An Appropriate 2×4 Wall Insulation?
Older homes are more likely to have 2×4 walls. So, you might think about utilizing rigid foam insulation if you’re remodeling or just want to increase indoor comfort and energy efficiency.
Yes, rigid foam is a good option for 2×4 walls. Is it the right decision? Not really. However, I’ll address that later. Depending on your current circumstances, rigid foam insulation may or may not be appropriate for 2×4 walls.
For example, rigid foam’s high R-value can help you achieve the necessary thermal resistance without being limited by the limited space, which is helpful because 2×4 walls often have minimal space.
Additionally, this kind of insulation is excellent for soundproofing your home and increasing energy efficiency.
What Benefits Can Rigid Foam Insulation Offer For 2×4 Walls?
Rigid foam insulation is preferred by contractors and homeowners for 2×4 walls for numerous reasons. These reasons include:
- Rigid foam ensures greater energy efficiency on your wall assemblies thanks to its high R-value per inch.
- In spite of limited space, it easily fits on 2×4 walls.
- Another function of rigid foam insulation is that of an air barrier, which enhances energy efficiency.
- Since rigid foam resists moisture, it will prevent water from penetrating your 2×4 walls.
- Rigid foam on your 2×4 walls will, as previously mentioned, lessen noise transfer.
- The durability of rigid foam is another quality I appreciate.
- Rigid foam insulation on your 2×4 walls won’t move or settle after it is installed. As a result, the thermal resistance will be constant.
What Kinds Of Rigid Foam Insulation Are Available For 2×4 Walls?
1. XPS: If you expect a lot of water exposure, this is the rigid foam insulation type to use. It is extremely durable, water resistant, and has a high R-value.
2. Polyiso: This variety is renowned for having a high R-value, fire resistance, and low heat conductivity.
3. EPS: Compared to the other types, its R-value is a little lower. However, it is more reasonably priced and significantly lighter.
4. Polyurethane: It comes in open-cell and closed-cell configurations. However, since the latter has a higher R-value and a closed-cell design that prevents moisture and air from passing through, I would suggest it for 2×4 walls.
How Can Rigid Foam Insulation Be Installed On 2×4 Walls?
Step 1: Compile Necessary Materials
A few supplies are required, including caulk, adhesive, tape measure, knife, screws, and rigid foam boards.
Step 2: Rigid Foam Measurement and Cutting
Taking measurements will be simpler because you are already aware of the dimensions of your walls. Cut the rigid foam according to the measurements you have, making sure to leave enough room for it to fit the frames.
Step 3: Apply adhesive to the foam board’s back.
Apply a thin layer of adhesive to the foam board’s rear. Making sure you use enough adhesive is crucial. Should you apply insufficient amount, the bonding strength will be weak. Additionally, the adhesive might overflow if you use too much.
Step 4: Fasten the Stiff Foam Against the 2×4 Wall
In general, rigid foam boards are lightweight. However, it’s a good idea to have assistance from an additional pair of hands during this step.
Usually, the adhesive is sufficient to hold the stiff foam board in place. However, I always recommend to my readers to take the extra step and screw the foam board.
Step 5: Find Any Gaps and Caulk Them
Your hard foam insulation could be compromised by gaps. They have the potential to seriously impair your assembly’s performance. So use caulk to seal them off. It would be easier for you to do your work if you could locate a caulk gun.
You can finish the walls any way you choose after you’re done. If you’d like to achieve a specific R-value, you can also add more layers of rigid foam.
Are Rigid Foam Insulation Uses in 2×4 Walls Subject To Any Particular Building Codes?
The issue is that building codes differ from location to location. It’s important for you to be aware that the use of rigid foam in 2×4 walls is governed by multiple building codes.
I’ll go over these codes in general terms with you. Yet, you must do your homework to determine which codes are applicable in your area;
- Energy Codes: Currently, the majority of the nation abides by energy codes that outline the necessary R-value in a given area. For example, in zone 3, the insulation needs to have an R-value of R30 to R60 if you’re installing rigid foam on 2×4 walls.
- Fire Safety Codes: Not all rigid foam insulations are fire-resistant, as I previously mentioned. You need to install more fire retardants if you want to make sure you pass the local fire safety codes.
- Structural Codes: Using rigid foam insulation can compromise the structural integrity of your walls and the building as a whole in regions that frequently experience bad weather or earthquake activity.
- Sustainability Codes: As more people become environmentally conscious, environmental codes that promote the use of extremely energy-efficient insulation systems are being introduced.
What Consequences Come With Installing Rigid Foam Insulation on 2×4 Walls?
There are a few disadvantages to using rigid foam insulation for 2×4 walls, even though it is compatible. Among them are
- Compared to other insulating materials for 2×4 walls, rigid foam is very expensive. Therefore, the initial costs of insulating a large home will be very high.
- When installing rigid foam on 2×4 walls, meticulous precision is necessary. Errors like leaving gaps can cause problems like thermal bridging and lower the installation’s effectiveness.
- There may be very few options for rigid foam thickness on 2×4 walls if you live in a place with stringent energy regulations.
- It’s crucial to remember that not all varieties of rigid foam insulation can withstand fire.
- It can also be very difficult to access wires and plumbing when your 2×4 walls are covered in rigid foam. Most people typically don’t anticipate this kind of issue.
Which Alternatives to Rigid Foam Insulation Are Appropriate for 2×4 Walls?
Recall that I previously mentioned that rigid foam isn’t the ideal insulation for 2×4 walls. So, these are some options that are worthwhile taking into account:
1. Fiberglass Batt: For 2×4 walls, this is the most effective insulation. Fiberglass is more beneficial than rigid foam for insulating 2×4 walls, but rigid foam has a higher R-value.
Fiberglass batts come in sizes that fit tightly against 2×4 walls and are less expensive and simpler to install.
2. Blown-in Cellulose: Before deciding on rigid foam, you might want to look into blown-in cellulose if you want to insulate 2×4 walls.
It is blown into wall cavities to provide thermal insulation, as the name implies. The best part is that it includes flame retardants, which raise your walls’ safety ratings.
3. Mineral Wool: Mineral wool is available in sizes that fit 2×4 walls, just like fiberglass batts. This option is excellent in raising your wall assembly’s fire ratings in addition to increasing energy efficiency.

