Mastering Cement Board Outside Corners: Expert Tips & Techniques

Water resistance and durability are just two of the many well-known qualities of cement board. However, the difficulty of finishing cement board outside corners is one of the concerns that both professional and do-it-yourself builders have expressed about this building material.
- Mastering Cement Board Outside Corners: Expert Tips & Techniques
- How Is Cement Board Completed Outside Corners?
- Step 1: Attach a metal corner bead.
- Step 2: Use fiberglass mesh tape to seal the joints between the metal corner bead and cement board.
- Step 3: Apply a thinset to the cement board outside the corner.
- Step 4: Sand the thinset and feather the outside corner's edges.
- What Other Transitional Items Are Acceptable on the Outside Corners of the Cement Board?
- Is it necessary to waterproof cement board outside corners?
- What Difficulties Are Associated with Cement Board Finishing Outside a Corner?
- What is the difference between finishing a cement board outside corner and an inside corner?
- Cement Board Maintenance Advice for Outside Corners
I’ll be sharing with you a comprehensive tutorial covering all the information you require if you have an approaching cement board installation project and are unsure of how to tackle the exterior corners.
How Is Cement Board Completed Outside Corners?
-
Step 1: Attach a metal corner bead.
I’m going to assume that you have already put the cement board on the nearby walls since we’re discussing the exterior corners. I’ll get right to the point on how you can complete the outside corners.
Installing a metal corner bead is the first step. This will serve as a component that connects the two cement boards.
Because it produces a straight and structurally sound outer corner, I advise installing a metal corner bead.
Therefore, trim the metal bead to the outside corner wall’s required height and fasten it with screws or bolts.
-
Step 2: Use fiberglass mesh tape to seal the joints between the metal corner bead and cement board.
Although some people would rather omit this step, it’s crucial. A fiberglass mesh tape helps to reinforce the outside corner’s structural integrity because the cement board and metal bead are composed of different materials.
Additionally, fiberglass mesh tape stops cracks from forming.
-
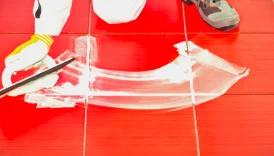
Step 3: Apply a thinset to the cement board outside the corner.
Prepare some thinset mortar and use a flat trowel to apply it to your outside corner to achieve a smooth and level finish.
Be careful to only apply thinset in thin layers over the mesh tape and metal corner bead. A bulging outside corner could result from applying thicker layers.
-
Step 4: Sand the thinset and feather the outside corner’s edges.
It’s typically a little challenging to achieve a smoother finish in the aforementioned phase unless you’re an expert. Feathing out the edges is therefore necessary.
Additionally, after the thinset dries, sand it down for a smoother surface. You can also fix any mistakes, like bumps and rough places, in the latter phase.
That’s it! After completing your cement board outside the corner, you will have achieved success. From here, you can finish the wall as you like, add tiling, or waterproof it.
What Other Transitional Items Are Acceptable on the Outside Corners of the Cement Board?
The preferred transitional elements for cement board outside corners are metal corner beads. However, there are other options available on the market. Here are a few options to think about:
- Vinyl corner beads: Made of plastic, these beads are identical to metal ones. They are simple to install and do not corrode, although they are not as strong as metal corner beads. They come in a variety of hues as well.
- Schluter RONDEC: Schluter RONDEC is another well-liked transitional component that is frequently used on cement boards outside corners. After installation, RONDEC creates a proportionately rounded corner that, in my opinion, is very visually pleasing.
- Bullnose trims: These are mostly used to mark the change of tiles. Therefore, I would strongly advise choosing this option if you plan to tile over the cement board.
In addition to being aesthetically pleasing, bullnose trims are excellent at preventing damage to the exterior corners.
- Wood trim: You can choose to utilize wood trim to produce an elegant cement board outside corner finish.
Those corners will stick out thanks to the rustic style that wood is known for. Please be aware that high moisture levels will not be conducive to the growth of wood trim.
Make sure the transitional piece is fixed appropriately on the cement board outside the corner, regardless of the type you choose.
Finishing a cement board outside the corner requires longevity, so don’t sacrifice it for beauty.
Is it necessary to waterproof cement board outside corners?
Naturally, waterproofing is required for the cement board outer corners. Waterproofing is essential for stopping moisture intrusion and water damage, regardless of whether you’re using a metal, vinyl, or wooden transitional piece.
Mold growth is one of the major problems you may have if you don’t waterproof the exterior corners.
Although it is not waterproof, the cement board itself is water-resistant. This indicates that it can tolerate exposure to moisture without suffering harm, but because it is porous, water will still be able to pass through. Therefore, you must waterproof the corners and the cement boards next to them.
These days, you can utilize a variety of waterproofing materials for this kind of project. You can use a liquid membrane like RedGard or a waterproof membrane like Kerdi.
To avoid direct exposure to rain or snow, you should think about putting flashing if this cement board outside corner is located on the outside of your house. The durability of your construction can be greatly increased by waterproofing the cement board outside of the corners.
What Difficulties Are Associated with Cement Board Finishing Outside a Corner?
It’s difficult to finish a cement board outside the corner, as I mentioned before. Experienced do-it-yourselfers and professional contractors both hold this view.
It’s a good idea to become acquainted with some of the typical challenges you might encounter and how to get beyond them if this is your first time taking on the assignment;
- Getting a smooth finish: It’s not easy to create a smooth finish when two cement boards meet at an outside corner.
The good news is that I’ve previously given you a thorough how-to instruction on how to do this. I won’t think about this too much, then.
- Cutting the cement board: You must use exact measurements and cuts to get the ideal angle on the cement board’s exterior corners. This requires a great deal of skill.
- Cracks: This is a prevalent problem with cement board outside corners. Without fiberglass mesh tape or a transitional piece, the corner will not have the necessary structural stability and may soon begin to crack.
- Tile installation: Hold off until tile installation is ready if you find it difficult to finish a cement board beyond the corner. After the tiles are installed, customers frequently find that they are not.
- Misalignment along the joints: It will be difficult to create a seamless union if one cement board is misaligned. Additionally, you might need to take out and put back in the cement board.
- Durability: External corners are more prone to harm. Therefore, those exterior corners might not endure very long unless you employ additional materials to improve the structural strength.
What is the difference between finishing a cement board outside corner and an inside corner?
The materials needed to finish an exterior corner and an inside corner are identical, but the methods are extremely different. The steep angle of the outside cement board corners makes completing them more challenging.
Conversely, a cement board inside the corner has a sharper angle, which facilitates the creation of a smoother finish.
Cement Board Maintenance Advice for Outside Corners
It’s important to take the required steps to make sure that a cement board outside the corner lasts as long as possible after completing all the work that goes into it.
The following maintenance advice is something to bear in mind:
- Make sure the corner is waterproofed and sealed at all times. The strength of the transitional piece and mortar may be weakened by moisture. It may also encourage the formation of mold.
- As soon as you see cracks, fix them. Cracks have the characteristic of spreading over time. However, you can stop the cracks from spreading much farther along the corners if you fix them.
- Examine the corners often. You can see wear indicators and stop them from getting worse with routine inspection.
- You should also constantly make sure that the outside corner of your cement board is clear of debris and clean. To keep the walls looking nice, don’t forget to recoat them every few years.