Drywall Tapered to Non-Tapered Edge
Installing drywall would be the simplest task on the earth if no joints were made. However, joints or seams will always be an issue, regardless of the size of your drywall sheets.
When two tapered edges are joined, the drywall connection is perfect. This facilitates the use of drywall compound to fill and smooth the gaps.
However, what if your drywall has both a tapered and a non-tapered edge? In what way would you combine these two to get a perfect finish?
The purpose of the article that follows is to show you how to join a tapered edge of drywall to a non-tapered edge and produce a clean finish.
What distinguishes a non-tapered edge from a tapered edge in drywall?
We must distinguish between these two kinds of drywall edges before moving on to the guide.
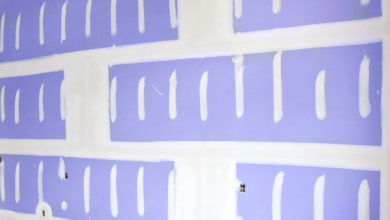
On the long ends of the sheet, a drywall tapered edge is often slightly thinner than other areas of the sheet. Fitting two tapered edges together is the most effective method of joining drywall sheets.
When linked together, the V gap created by these narrower edges may hold the drywall compound. Compared to the rest of the drywall, the tapered edge is around an eighth inch narrower.
The end of a drywall sheet that has been sliced into one or two pieces is known as a non-tapered edge. The thickness of non-tapered edges is typically equal to that of other drywall components. The non-tapered edge, for example, will be half an inch thick if the drywall is half an inch thick.
It normally takes a lot of effort to connect non-tapered edges because the joints don’t have a V-gap that can hold the drywall compound.
Joining a tapered edge of drywall to a non-tapered edge is a common occurrence. You might occasionally need to cut some boards to fit specific spaces when putting drywall.
You will probably have a seam with both a tapered and non-tapered edge after cutting some of these boards.
How Can a Tapered Drywall Edge Be Joined to a Non-Tapered Edge?
-
Step 1: Collect Necessary Supplies
Additionally, you will require a few tools. Sanding screens, drywall tape, and drywall compound are a few examples.
Other useful tools include a sander, a utility knife, and a drywall knife. I strongly advise you to get breathing protection. Drywall sanding may be very dusty.
-
Step 2: Cut the non-tapered edge at a 45-degree angle.
Creating a V-gap akin to the tapered edge is not the purpose of this cut. However, the stray paper on the non-tapered edge is eliminated by this cut.
The paper frequently buckles and forms a ridge that can detract from the surface if you don’t remove it from this edge. Make a 45-degree cut on the non-tapered edge before moving on to the next step.
Although it can be tempting, creating a tapered edge by hand is typically challenging, particularly when using a utility knife.
-
Step 3: Tape the seam and apply some drywall compound.
Apply compound to the joints of your tapered and non-tapered edges using a drywall knife. Avoid using too much compound as this will result in a significant bump.
Cut and tape the seam right away. Make sure there are no wrinkles or bubbles and that it sticks firmly. You can get rid of any bubbles that are developing behind the tape by using a drywall knife. The drywall knife should remove any excess compound from the tape.
Before working over drywall tape, it’s always a good idea to let it dry. While still wet, the tape is easily movable. Twenty-four hours ought to be sufficient.
-
Step 4: Add Additional Drywall Compound
The tape should never be left uncovered for aesthetic reasons. For this reason, you should cover the tape with more drywall compound. The compound should not be dispersed too far from the tape.
Make sure the distance from the seam is at least one or two inches. Make sure to use a utility knife to smooth up the drywall compound as you apply it.
-
Step 5: Sand the Seam to Get Rid of Bumps
It’s common for joints to have bumps if you’re new to installing drywall. Fortunately, sanding is an easy way to get rid of them.
Check the seam for any lumps that appear to be sticking out. Lightly sand them down. Sanding the entire seam is not advised as this could cause interference with the tape.
Sanding drywall can be somewhat dusty, so it’s best to wear a mask throughout this phase.
-
Step 6: Lightly sand it after applying the last coat of drywall compound.
Applying the last application of drywall compound will complete your project. This time, distribute it farther from the seam using a larger drywall knife.
This gives the remaining drywall a consistent finish. If you see any peaks or bumps, you can also sand it down.
In order to connect a tapered edge to a non-tapered edge, how much drywall compound is required?
You should use as little drywall compound as feasible for such a junction. There is not enough space in the seam for a lot of drywall compound when attaching a tapered edge to a non-tapered one.
As a result, excessive application could result in a large bump that requires extensive sanding to be flat with the remaining drywall. It’s best not to use too much drywall compound.
Can I Complete Such a Project on My Own, or Do I Require Expert Assistance?
The ability to join two sheets of drywall requires practice. Even combining two tapered edges can be difficult if you don’t have the necessary skills.
The good news is that you can produce a smooth union between a tapered and non-tapered edge by following the above tips. You don’t require expert assistance if you’ve been doing drywall installation for a while.
However, I would suggest hiring a professional for this kind of work if you have never installed drywall before.
Will a Drywall Edge Without Tapers Reduce Joint Strength?
The drywall’s structural strength is, in fact, due to the paper on the edge. You won’t have to worry about the non-tapered edge, though, as long as you cover the junction with drywall tape and compound.
Is it not possible to use fresh drywall sheets to replace the non-tapered edges?
If a joint has both a tapered and a non-tapered edge, you can always use fresh drywall sheets with tapered edges to replace the latter. And your seam will be flawless.
But you’ll waste a lot of drywall sheets if you do that. Additionally, such a strategy can result in significant financial waste if you are on a tight budget. Making a joint according to the guidelines in the above advice is the most cost-effective approach.
Is It Possible to Locate Drywall with Untapered Edges?
Every piece of drywall has tapered corners. Cutting one down is the only way to get non-tapered drywall edges. However, drywall sheets that are made without tapering edges are uncommon.
Given how difficult it is to link non-tapered drywall pieces to tapered edges, it is even more difficult to see why anyone would be interested in such components.