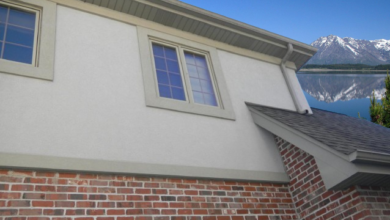
Brick to Siding Transition

You shouldn’t be surprised if you find a house that has siding in addition to brick. If you intend to develop such a concept, you need to decide what you will use as a transition.
The latter is crucial because it guards against moisture and water leaks that could harm your interior walls. It also enhances the external appearance of your house.
I’ll walk you through a do-it-yourself tutorial in this post on how to construct the ideal brick-to-siding transition. I’ll also include a few things you should consider when working on this project.
Is It Possible To Go From Brick To Siding?
You can make the switch from brick to siding, despite the fact that it might seem impossible. You will need a metal sheet flashing in order to complete this task. This is essential to a smooth transition from brick to siding.
How Is A Brick-To-Siding Transition Performed?
- Step 1: Compile Necessary Materials
As with all construction projects, it is imperative that you put together all necessary tools and supplies before beginning work. In this instance, you will require house wrap, a metal cutter, a hammer, some caulking, a few nails, and metal flashing.
- Step 2: Determine How Long the Brick-to-Siding Transition Will Be
The majority of people make the error of fitting the flashing while moving forward. Measuring the length of this joint or intersection is advised, though.
You can use this information to calculate the amount of flashing required to seal the transition. Longer intersections will require the use of multiple flashing pieces. Remember that while you’re gathering your supplies.
- Step 3: Determine the desired length by measuring and cutting the flashing.
This flashing requires a metal cutter because it is made of metal. Cut the flashing to the appropriate height using the length that was computed above as a guide. Your work should be made easier by the cutters.
- Step 4: Fill the Space Between the Siding and Brick with Caulk
Caulking is a commendable method for sealing joints in siding and brick. Put a lot of caulk in the space between the siding and the brick.
In this step, a caulking gun comes in handy. I strongly advise caulking the back of the metal flashing to guarantee a perfectly sealed transition. As a result, there won’t be much moisture penetration.
- Step 5: Install the metal flashing where the siding and brick meet.
As soon as possible, take the caulked and cut metal flashing and install it into the transition. The caulking is not dependable for adhesion.
Thus, take a few nails and pound them into the change. Disperse the news a couple of inches wide. Use rust-free nails whenever possible, as they won’t corrode quickly.
- Step 6: Use House Wrap to Cover the Transition
Complete your transition with house wrap, then begin the siding installation. Please take note that the metal flashing must go beneath the siding rather than on top of it. When it comes to stopping water from entering the transition, the first option works better.
Considerations For The Transition From Brick to Siding
- Local building codes: Rules differ depending on where you live. Always make sure that a brick-to-siding transition complies with your local codes to avoid any problems with the authorities.
- Brick condition: Never construct a transition over a damaged brick. Replacing any worn-out bricks and working on your transition is the best course of action.
- Aesthetics: Brick and siding don’t mix in well. As a result, you must install the flashing in this transition with extreme caution.
To create an impeccable transition, the flashing should perfectly blend the siding with the brick. Thankfully, flashings are available in a variety of materials and finishes. You shouldn’t have too much trouble mastering aesthetics.
- A moisture-proof setup: When switching from brick to siding, most people give aesthetics top priority. But the most important thing should be to have a setup that is waterproof.
You must install a weather-resistant barrier to prevent moisture and water from penetrating the interior walls when switching between these two surfaces. Caulk can be a useful tool for sealing gaps that could allow moisture to seep through.
- Durability: Metal flashing is more durable, which is the primary reason I suggested it. Although plastic flashing is also an option, it is not as durable as its metal equivalent. Achieving durability should be your primary objective when constructing such a setup.
- Energy Efficiency: When switching from brick to siding, take caution to avoid creating a thermal energy leak.
High electricity costs and discomfort are the eventual results of this. You can always add more insulation when siding is installed over brick.
What Could Go Wrong When Converting From Brick to Siding?
All should go well if you follow the instructions I have provided above. There are a few potential problems, though. It’s critical to comprehend these problems and appropriate solutions.
Finding structural damage is one of the most frequent issues you might run into. Even though they are strong, brick walls can get wet and decayed.
You might find structural damage when installing a flashing between siding and brick that needs to be fixed before continuing.
The costs related to this project are another item you need to be aware of. You’ll need to purchase metal flashing and caulking. You might also need to hire a contractor to complete the transition if you’re not a big do-it-yourselfer.
In some cases, doing a bad installation can lead to a host of issues. Poorly installed flashing between siding and brick can cause problems like water damage, interior wall rot, inadequate ventilation, and inadequate insulation.
You have to use extreme caution when executing the above steps in order to prevent these issues. If you are at all unsure of your abilities, don’t be afraid to get professional assistance.
How Can You Make Sure The Transition From Brick to Siding Is Visually Appealing?
We can all agree that when building a brick-to-siding transition, aesthetics are important. There is only this horrible space between these two walls that a metal flashing will cover.
Make sure the brick and siding are the same color if you want an attractive transition. And you can accomplish this in a few different ways.
You must first take note of the brick that is already in place. Look at the design, color, and texture of it. That will serve as your design’s foundation.
After that, you can paint or search for a flashing that contrasts with or enhances the brick. This is the step where you have to be creative. You can get assistance with this from an architect or home designer.
Looking for ideas from existing homes with a brick-to-siding transition can help you improve the appearance of your own house. Hundreds of photos of homes with a brick-to-siding transition can be found online.
Is A Moisture Barrier Necessary During the Transition From Brick to Siding?
You do, indeed. A metal flashing cannot stop water from entering the space between siding and brick on its own.
On the other hand, a high-quality moisture barrier will keep water out and stop rot, mold, and damage. As a result, never try installing a brick-to-siding transition in the absence of a moisture barrier.